 visuals + editorial graphics
Managing Instagram Photo Call-Outs

At NPR, we regularly ask our audience to submit photos on a certain theme related to a series or particular story. We wanted a way to streamline these callouts on Instagram using the hashtag we’ve assigned, so we turned to IFTTT.
IFTTT is a website whose name means “If This, Then That.” You can use the service to set up “recipes” where an event on one site can trigger a different event on another site. For example, if someone tags an Instagram photo with a particular hashtag, IFTTT can log it in a Google Spreadsheet. (Sadly, this will not work with photos posted to Twitter.)
Here, we’ll explain our workflow, from IFTTT recipe to moderation to putting the results on a page.
(Side note: Thanks to Melody Kramer, who introduced the idea of an IFTTT moderation queue for our “Planet Money Makes A T-Shirt” project. Our workflow has evolved quite a bit since that first experiment.)
Build A Spreadsheet Of Photos With IFTTT
Set this up at the very beginning of the process, before you’ve publicized the callout. IFTTT will only pull in images as they are submitted. It will not pull images that were posted before we set up the recipe.
(A note about accounts: Rather than use someone’s own individual account, we created team Gmail and IFTTT accounts for use with these photo callouts. That way anyone on the team can modify the IFTTT recipes. Also, we created a folder in our team Google Drive folder just for photo callouts and shared that with the team IFTTT Gmail account.)
First step: Go to Google Drive. We’ve already set up a spreadsheet template for callouts with all of the column headers filled in, corresponding with the code we’ll use to put photos on a page later on. Make a copy of that spreadsheet and rename it something appropriate to your project (say, photo-cats).
Next, log into IFTTT.
Before you set up your recipe, double-check your IFTTT account preferences. By default, IFTTT runs all links through a URL shortener. To make it use the original Instagram and image URLs in your spreadsheet, go into your IFTTT account preferences and uncheck URL shortening.

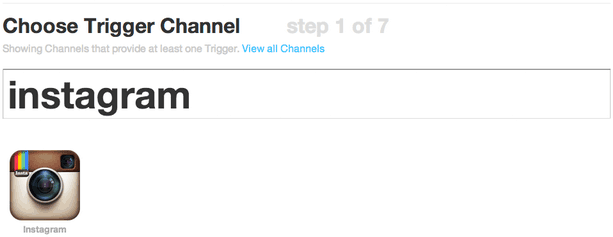
Now, create a new recipe (“create” at the top of the page).
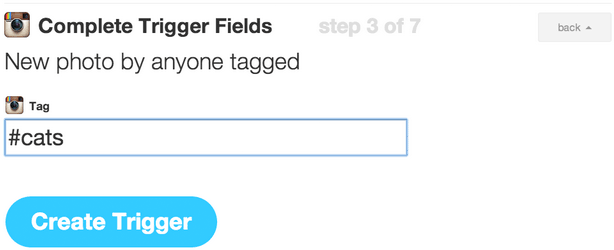
Select Instagram as the “trigger channel,” and as the trigger, a new photo by anyone tagged. (Note: If we wanted to pull in Instagram videos, we would need to make a separate recipe for just video.)
Then enter your hashtag (in this case, #cats).
(Note: We’re not using this to scrape Instagram and republish photos without permission. We’d normally use a much more specific hashtag, like #nprshevotes or #nprpublicsquare — the assumption being that users who tag their photos with such a specific hashtag want NPR to see the photos and potentially use them. But for the sake of this example, #cats is fun.)
Next, select Google Drive as the “action channel,” and add row to spreadsheet as the action.
Put the name of the spreadsheet in the Spreadsheet name box so IFTTT can point to it, in this case photo-cats. (If the spreadsheet does not already exist, IFTTT will create one for you, but it’s better to copy the spreadsheet template because the header labels are already set up.)

In the formatted row, IFTTT gives you a few options to include data from Instagram like username, embed code, caption, etc. Copy and paste this to get the same fields that are in the spreadsheet template:
{{CreatedAt}} ||| {{Username}} ||| {{Caption}} ||| {{Url}} ||| =IMAGE("{{SourceUrl}}";1) ||| {{SourceUrl}} ||| {{EmbedCode}}
Then point the spreadsheet to the Google Drive folder where your spreadsheet lives — in this case, photo-callouts. Once your recipe has been activated, hit the check button (with the circle arrow) to run the recipe for the first time. IFTTT will run on its own every 15 minutes or so, appending information for up to 10 images at a time to the bottom of the spreadsheet.
Moderating Photos Using Google Spreadsheets
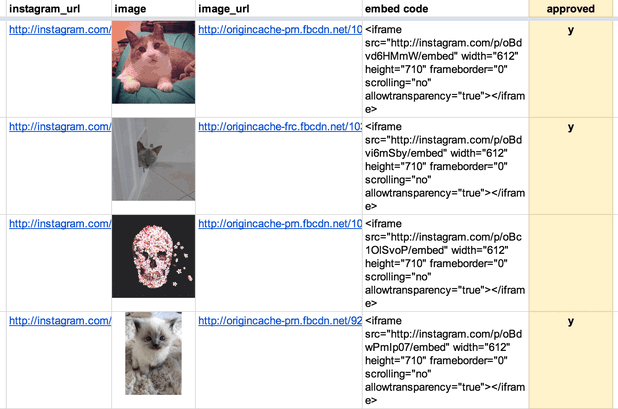
Not every photo will meet our standards, so moderation will be important. Our spreadsheet template has an extra column called “approved.” Periodically, a photo editor will look at the new photos added to the spreadsheet and mark approved images with a “y.”
Here’s an example of a mix of approved and not approved images (clearly, we wanted only the best cat photos):
To reorder images, you can either manually reorder rows (copy/pasting or dragging rows around), or add a separate column, number the rows you want and sort by that column. In either case, it’s best to wait until the very end to do this.
When you’ve reached your deadline, or you’ve collected as many photos as you need, remember to go back into IFTTT and turn off the recipe — otherwise, it’ll keep running and adding photos to the spreadsheet.
Adding Photos To A Page And Publish Using dailygraphics
So we have a spreadsheet, and we know which photos we want. Now to put them on a page.
The NPR Visuals system for creating and publishing small-scale daily projects has built-in support for copytext, a Python library that Christopher Groskopf wrote to pull content from Google Spreadsheets. The dailygraphics system, a stripped-down version of our team app-template, runs a Flask webserver locally and renders spreadsheet content to the page using Jinja tags. When it’s time to publish the page, it bakes everything out to flat files and deploys those files to S3. (Read more about dailygraphics.)
(In our private graphics repo, we have a template for photo callouts. So an NPR photo producer would duplicate the photo-callout-template folder and rename it something appropriate to the project — in this case, photo-cats.)
If you’re starting from scratch with dailygraphics (read the docs first), you’d instead use fab add_graphic:photo-cats to create a new photo mini-project.
Every mini-project starts with a few files: an HTML file, a Python config file and supporting JS libraries. For this project, you’ll work with child_template.html and graphic_config.py.
First, connect to the Google Spreadsheet. In graphic_config.py, replace the COPY_GOOGLE_DOC_KEY with the key for your Google Spreadsheet, which you can find (highlighted here) in the spreadsheet’s URL:

Run fab update_copy:photo-cats to pull the latest spreadsheet content down to your computer.
And here are the template tags we’ll use in child_template.html to render the Google Spreadsheet content onto the pages:
<div id="callout">

    <!-- Loop through every row in the spreadsheet -->

    {% for row in COPY.instagram %}

    <!-- Check if the photo has been approved.
         If not, skip to the next line.
         (Notice that “approved” matches the column
         header from the spreadsheet.) -->

        {% if row.approved == 'y' %}

        <section
            id="post-{{ loop.index }}"
            class="post post-{{ row.username }}">

    <!-- Display the photo and link to the original image on Instagram.
         Again, “row.instagram_url” and “row.image_url” reference
         the columns in the original spreadsheet. -->

            <div class="photo">
                <a href="{{row.instagram_url}}"  target="_blank"><img src="{{ row.image_url }}" alt="Photo" /></a>
            </div>

    <!-- Display the photographer’s username, the photo caption
         and a link to the original image on Instagram -->

            <div class="caption">
                <h3><a href="{{row.instagram_url}}" target="_blank">@{{ row.username }}</a></h3>
                <p>{{ row.caption }}</p>
            </div>

        </section>

       {% endif %}
    {% endfor %}
</div>
(If you started from the photo-callout-template, you’re already good to go.)
Preview the page locally at http://localhost:8000/graphics/photo-cats/, then commit your work to GitHub. When you’re ready, publish it out: fab production deploy:photo-cats
Put This On A Page In The CMS
Everything for this photo callout so far has happened entirely outside our content management system. But now we want to put this on an article page or blog post.
Seamus, NPR’s CMS, is very flexible, but we’ve found that it’s still good practice to keep our code-heavy work walled off to some degree from the overall page templates so that styles, JavaScript and other code don’t conflict with each other. Our solution: embed our content using iframes and Pym.js, a JavaScript library that keeps the iframe’s width and height in sync with its content.
Our system for small projects has Pym.js already built-in. At the bottom of the photo callout page, there is a snippet of embed code.

Copy that code, open the story page in your CMS, and add the code to your story as a new HTML asset. And behold: