 visuals + editorial graphics
Three interesting code snippets from NPR's Election Party
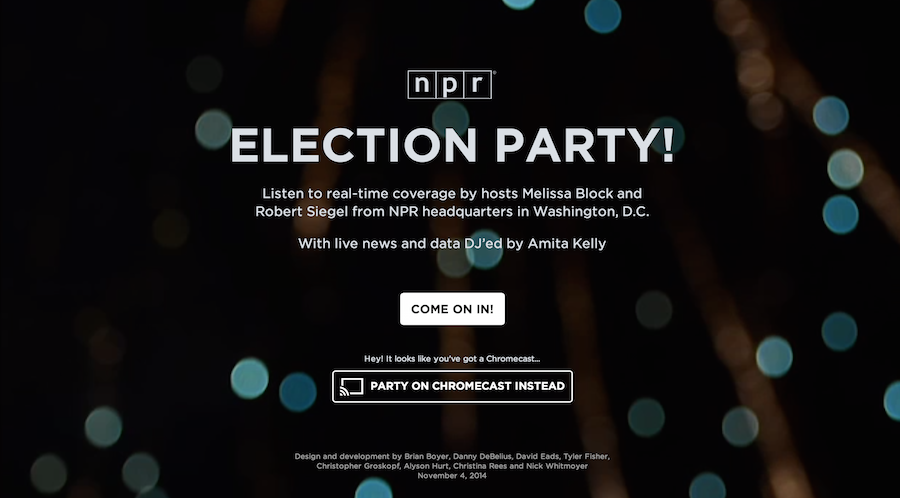
NPR’s Election Party app has a lot of moving parts. It displays live election results from the Associated Press, ingests posts from our Tumblr liveblog, bakes out visualizations of our data, and presents all of this in a slideshow that, on election night, was continuously changing through an admin. It even works as a Chromecast app.
All of the code is open source and freely available to read and use, but it can be hard to make sense of all of it without knowledge of our app template and all the things this app actually does.
There are countless little snippets of this app I could share, but I chose three pieces of the app that would be interesting to share in isolation.
Deploying bug fixes by reloading your users’ browsers
Our app was a static web page, as all of our apps are. We had a server separately parsing AP data, ingesting Tumblr posts and baking out the static website every few minutes, but the client never touched the server. This made it difficult to deploy bug fixes if something broke on election night.
To solve this problem, we devised a simple way to force every client to refresh the web page. We deployed a file with a timestamp to S3, and on page load, the client downloaded that file, read the timestamp and stored it. Then, every three minutes, the client would check that file to see if the timestamp had changed. If the timestamp had changed, the browser refreshed the page. Here’s the client-side code:
var reloadTimestamp = null;

var getTimestamp = function() {
    // get the timestamp on page load
    if (reloadTimestamp == null) {
        checkTimestamp();
    }

    // continually check the timestamp every three minutes
    setInterval(checkTimestamp, 180000);
}

var checkTimestamp = function() {
    $.ajax({
        'url': '/live-data/timestamp.json',
        'cache': false,
        'success': function(data) {
            var newTime = data['timestamp'];

            // if we haven't set a timestamp yet, set it
            if (reloadTimestamp == null) {
                reloadTimestamp = newTime;
            }

            // if the initial timestamp doesn't match the new one, refresh
            if (reloadTimestamp != newTime) {
                // set a cookie in case we need to something to happen
                // when the page reloads
                $.cookie('reload', true);
                window.location.reload(true);
            }
        }
    });
}

$(document).ready(function)() {
    getTimestamp();

    // stuff you only want to happen if we forced a refresh
    if ($.cookie('reload')) {
        // for example, skip a welcome screen or hide some UI element

        $.removeCookie('reload');
    }
});
Locally, we could deploy the new timestamp file with a simple Fabric command and deploy function:
#!/usr/bin/env python

from datetime import datetime
import json

from fabric.api import local, task

@task
def reset_browsers():
    """
    Create a timestampped JSON file so the client will reset their page.
    """
    payload = {}

    # get current time and convert to epoch time
    now = datetime.now().strftime('%s')

    # set everything you want in the json file
    payload['timestamp'] = now

    with open('www/live-data/timestamp.json', 'w') as f:
        json.dump(now, f)

    deploy_json('www/live-data/timestamp.json', 'live-data/timestamp.json')

def deploy_json(src, dst):
    """
    Deploy to S3. Note the cache headers.
    """
    bucket = 'elections.npr.org'
    region = 'us-west-2'

    sync = 'aws s3 cp %s %s --acl "public-read" --cache-control "max-age=5 no-cache no-store must-revalidate" --region "%s"'

    local(sync % (src, 's3://%s/%s' % (bucket, dst), region))
We used this once early in the night when we discovered an error with how we were displaying some of our slide types. It worked well, and we could assume all of our users were using the latest versions of our code.
Here is a gist of the described code above.
Widescreen slides on any device
For our app, we decided to optimize for 16x9 or wider devices, which gets you most TVs, laptops, tablets and phones (in landscape mode). Fixing these slides to this aspect ratio and getting everything in the slides to size appropriately was tricky. We used an unusual technique to achieve this.
First, we set the base font size to 1 vw (that is, 1% of the viewport width). Then, we scaled everything else with rem units (like an em unit, but based only on the base font size). By doing this, we were able to accomplish a couple things: We ensured that everything scaled to 16x9 based on the width of the viewport. With some JavaScript, we could also shrink the base font size when the client browser is shorter than 16x9.
A demo of this is simple.
Your HTML file needs only a wrapper div and some content in it:
<div id="stack">
    <div class="big">
    BIG
    <div class="em"></div>
    </div>
    <div class="little">
        little
        <div class="em"></div>
    </div>
</div>
Then, in a CSS file, we set the base font size on the html element to 1vw and ensure there is no margin on the body:
html { font-size: 1vw; }
body { margin: 0; }
On the wrapper div, we set a few critical styles to making this work, as well as some styles that make the demo visible:
#stack {
    box-sizing:border-box;
    -moz-box-sizing:border-box;
    -webkit-box-sizing:border-box;

    // 16x9 aspect ratio
    width: 100rem;
    height: 56.25rem;

    // centering if the screen is wider than 16x9
    margin: 0 auto;

    // for the sake of testing
    border:4px dashed black;
}
In addition, we used rems for all other measurements, including font sizes, widths and heights, so that they would scale appropriately:
.big {
    font-size: 10rem;
}

.little {
    font-size: 2rem;
}

.em {
    background-color: blue;
    width: 1rem;
    height: .1rem;
}
Finally, to make this fully responsive, we need a JavaScript resize function to change the base font size when appropriate:
var onWindowResize = function(){
    // get aspect ratio of current window
    var aspect = window.innerWidth / window.innerHeight;

    /*
    * If the window is wider than 16/9, adjust the base font size
    * so that the wrapper stays 16/9, and letterboxes
    * to the center of the screen.
    */

    if ( aspect > 16/9) {
        document.documentElement.style.fontSize = ((16/9) / aspect) + 'vw';
    } else {
        document.documentElement.style.fontSize = '1vw';
    }
}
This, of course, required prompting users to shift their phones and tablets into landscape mode.
If you want to see this demo in action, see it on Codepen and resize your browser a bunch. In addition, here is a gist of all the code.
Developing Chromecast applications in JavaScript
The functionality we desired for Chromecast users went beyond simple tab mirroring, which Chromecast allows you do to with any website. Instead, we wanted to make your casting device a remote control, able to mute audio and navigate between slides. To do so, we had to use the Google Cast SDK. The Cast SDK allows you to make the Chromecast load your app on an internal version of Chrome installed on the hardware.
The SDK works pretty well, and other people have done good work in documenting how to get a Chromecast app set up. Peter Janak, in particular wrote a Chromecast Hello World application that was very helpful for us.
To make our lives easier, we wrote a simple library to handle initializing Chromecast sessions and passing messages between the connected device and the Chromecast. Next time we develop a Chromecast app, we will probably develop this further into a standalone library, but it works well as is now.
In addition to embedding the SDK JavaScript on your site, we have two files, chromecast_sender.js and chromecast_receiver.js. Read the full source here. These files provide a friendlier API for interacting with the Chromecast. Specifically, they define the CHROMECAST_SENDER and CHROMECAST_RECEIVER objects, which allow you to interact with casting devices and Chromecasts in code.
First, to setup a Chromecast app, you need to check if a user has the Chromecast extension installed:
// define some global vars
var IS_CAST_RECEIVER = (window.location.search.indexOf('chromecast') >= 0);
// is a currently casting device
var is_casting = false;

window['__onGCastApiAvailable'] = function(loaded, errorInfo) {
    // We need the DOM here, so don't fire until it's ready.
    $(function() {
        // Don't init sender if in receiver mode
        if (IS_CAST_RECEIVER) {
            return;
        }

        // init sender and setup callback functions
        CHROMECAST_SENDER.setup(onCastReady, onCastStarted, onCastStopped);
    });
}
An important thing to keep in mind is that, in our model, the Chromecast app actually runs the same code as the client. You need to maintain state across your app so that your code knows whether the client is a Chromecast or a regular web browser. Thus, you would have a function for the sender when a Chromecast session is initiated, and a code path in your ready function for Chromecasts specifically:
// function for casting devices
var onCastStarted = function() {
    is_casting = true;

    // show what you want to appear on the casting device here
    $chromecastScreen.show();
    $castStart.hide();
    $castStop.show();
}

// example code path when the document is ready
$(document).ready(function() {
    if (IS_CAST_RECEIVER) {
        CHROMECAST_RECEIVER.setup();

        // Set up event listeners here
        CHROMECAST_RECEIVER.onMessage('mute', onCastReceiverMute);
    }
});
Note that you can set event listeners on the Chromecast. This allows you to send messages between the casting device and Chromecast, which powered our remote control functionality. Here’s an example message sending function and receiver callback that allowed us to mute the audio on the TV from the casting device:
/*
 * Cast receiver mute
 */
var onCastReceiverMute = function(message) {
    if (message == 'true') {
        $audioPlayer.jPlayer('pause');
    } else {
        $audioPlayer.jPlayer('play');
    }
}

/*
 * Unmute the audio.
 */
var onAudioPlayClick = function(e) {
    e.preventDefault();

    if (is_casting) {
        CHROMECAST_SENDER.sendMessage('mute', 'false');
    } else {
        $audioPlayer.jPlayer('play');
    }

    $audioPlay.hide();
    $audioPause.show();
}

/*
 * Mute the audio.
 */
var onAudioPauseClick = function(e) {
    e.preventDefault();

    if (is_casting) {
        CHROMECAST_SENDER.sendMessage('mute', 'true');
    } else {
        $audioPlayer.jPlayer('pause');
    }

    $audioPause.hide();
    $audioPlay.show();
}
Importantly, we were able to handle both casting devices and one-screen sessions in the same code path thanks to our state variables.
Again, read the full source of our Chromecast code in this gist.
The many moving parts of our elections app created more interesting pieces of code, and you can dig through everything in our repo. As always, the code is open source and free to use.