 visuals + editorial graphics
How to Set Up Your Mac to Develop News Applications Like We Do
Last updated May 14, 2025. We’ve switched to using uv for environment management.
New edition Nov. 7, 2023. We’ve overhauled our step-by-step guide to setting up your machine the way we do on the NPR News Apps team. This edition is by Daniel Wood, with notes from Ruth Talbot, Rina Torchinsky, Nick Underwood, Koko Nakajima and Brent Jones.
First authored in 2013 by Gerald Rich, this page continues to be a living document, updated as systems and software update. Geoff Hing, David Eads, Livia Labate, Tyler Fisher, Shelly Tan, Helga Salinas, Juan Elosua, Miles Watkins and Thomas Wilburn have contributed over the years.
The following steps assume you’re working on a new Mac with macOS Catalina 10.15 or more recent. These directions should generally be applicable for anything more recent than Catalina as well.
Note: If there are two lines inside any of the code blocks in this article, paste them separately and hit enter after each of them.
Chapter 0: Prerequisites
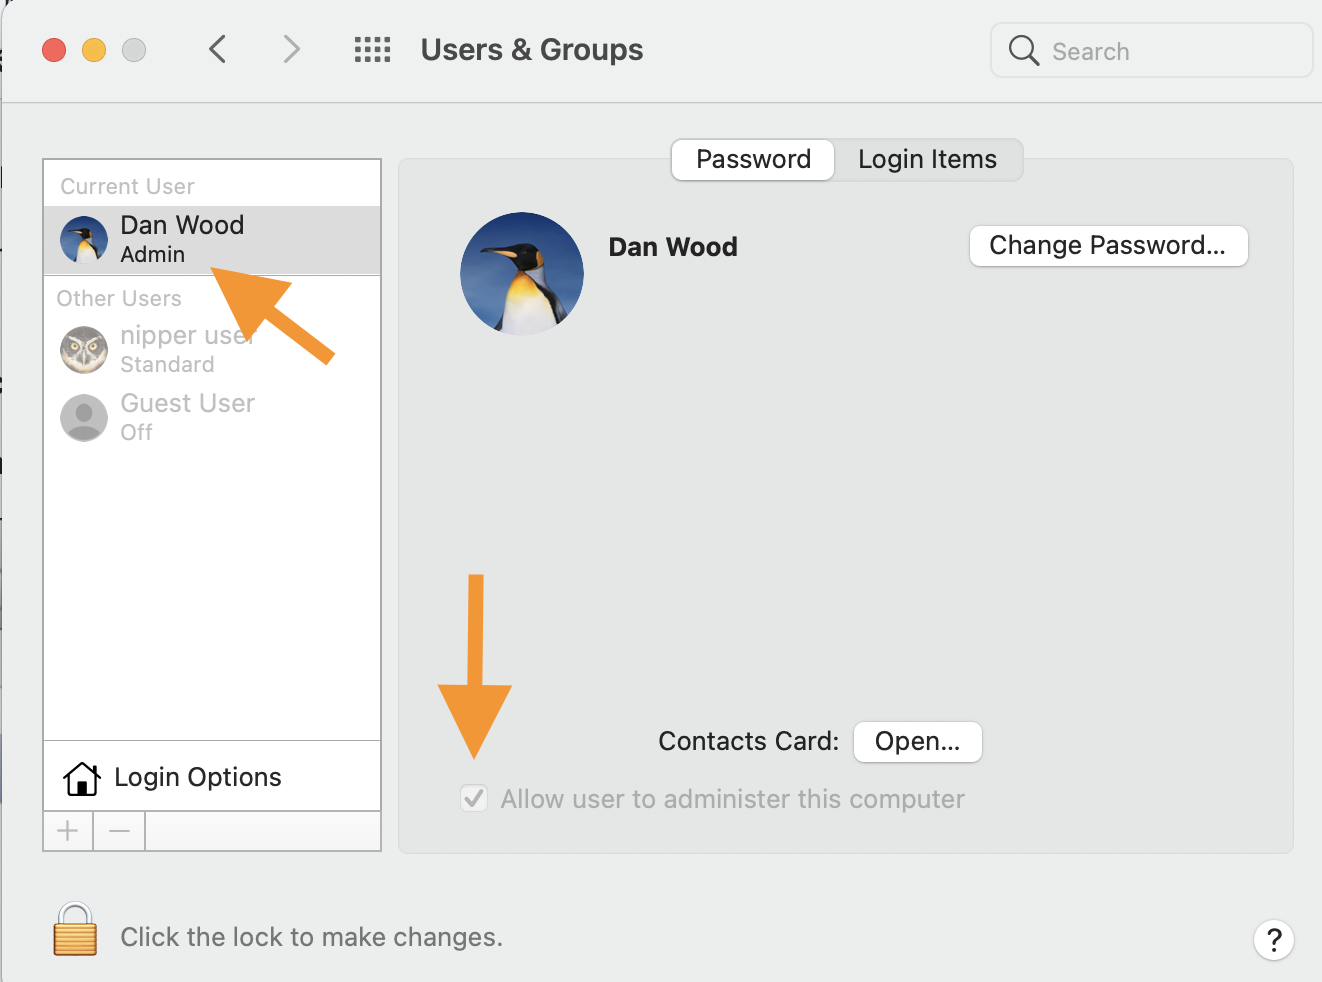
Are you an administrator?
We’ll be installing a number of programs from the command line in this tutorial, so that means you must have administrative privileges. If you’re not an admin, talk with your friendly IT Department.
Click on the Apple menu > System Preferences > Users & Groups and check your status against this handy screenshot.
Update your software
Go to the App Store and go to the updates tab. If there are system updates, install and reboot until there is nothing left to update.
Install command line tools
The command line tools from Apple provide a crucial suite of tools you’ll need to use version control (git) and Python. The main commands you may come across that come from command line tools are git, make, clang, and gcc.
All Macs come with an app called “Terminal.” You can find it under Applications > Utilities. Double click to open it, (or hit cmd-space and type “terminal”). Once it’s booted, run this command:
xcode-select --install
Your laptop should prompt you to install the command line tools. The process should take about 5 minutes.
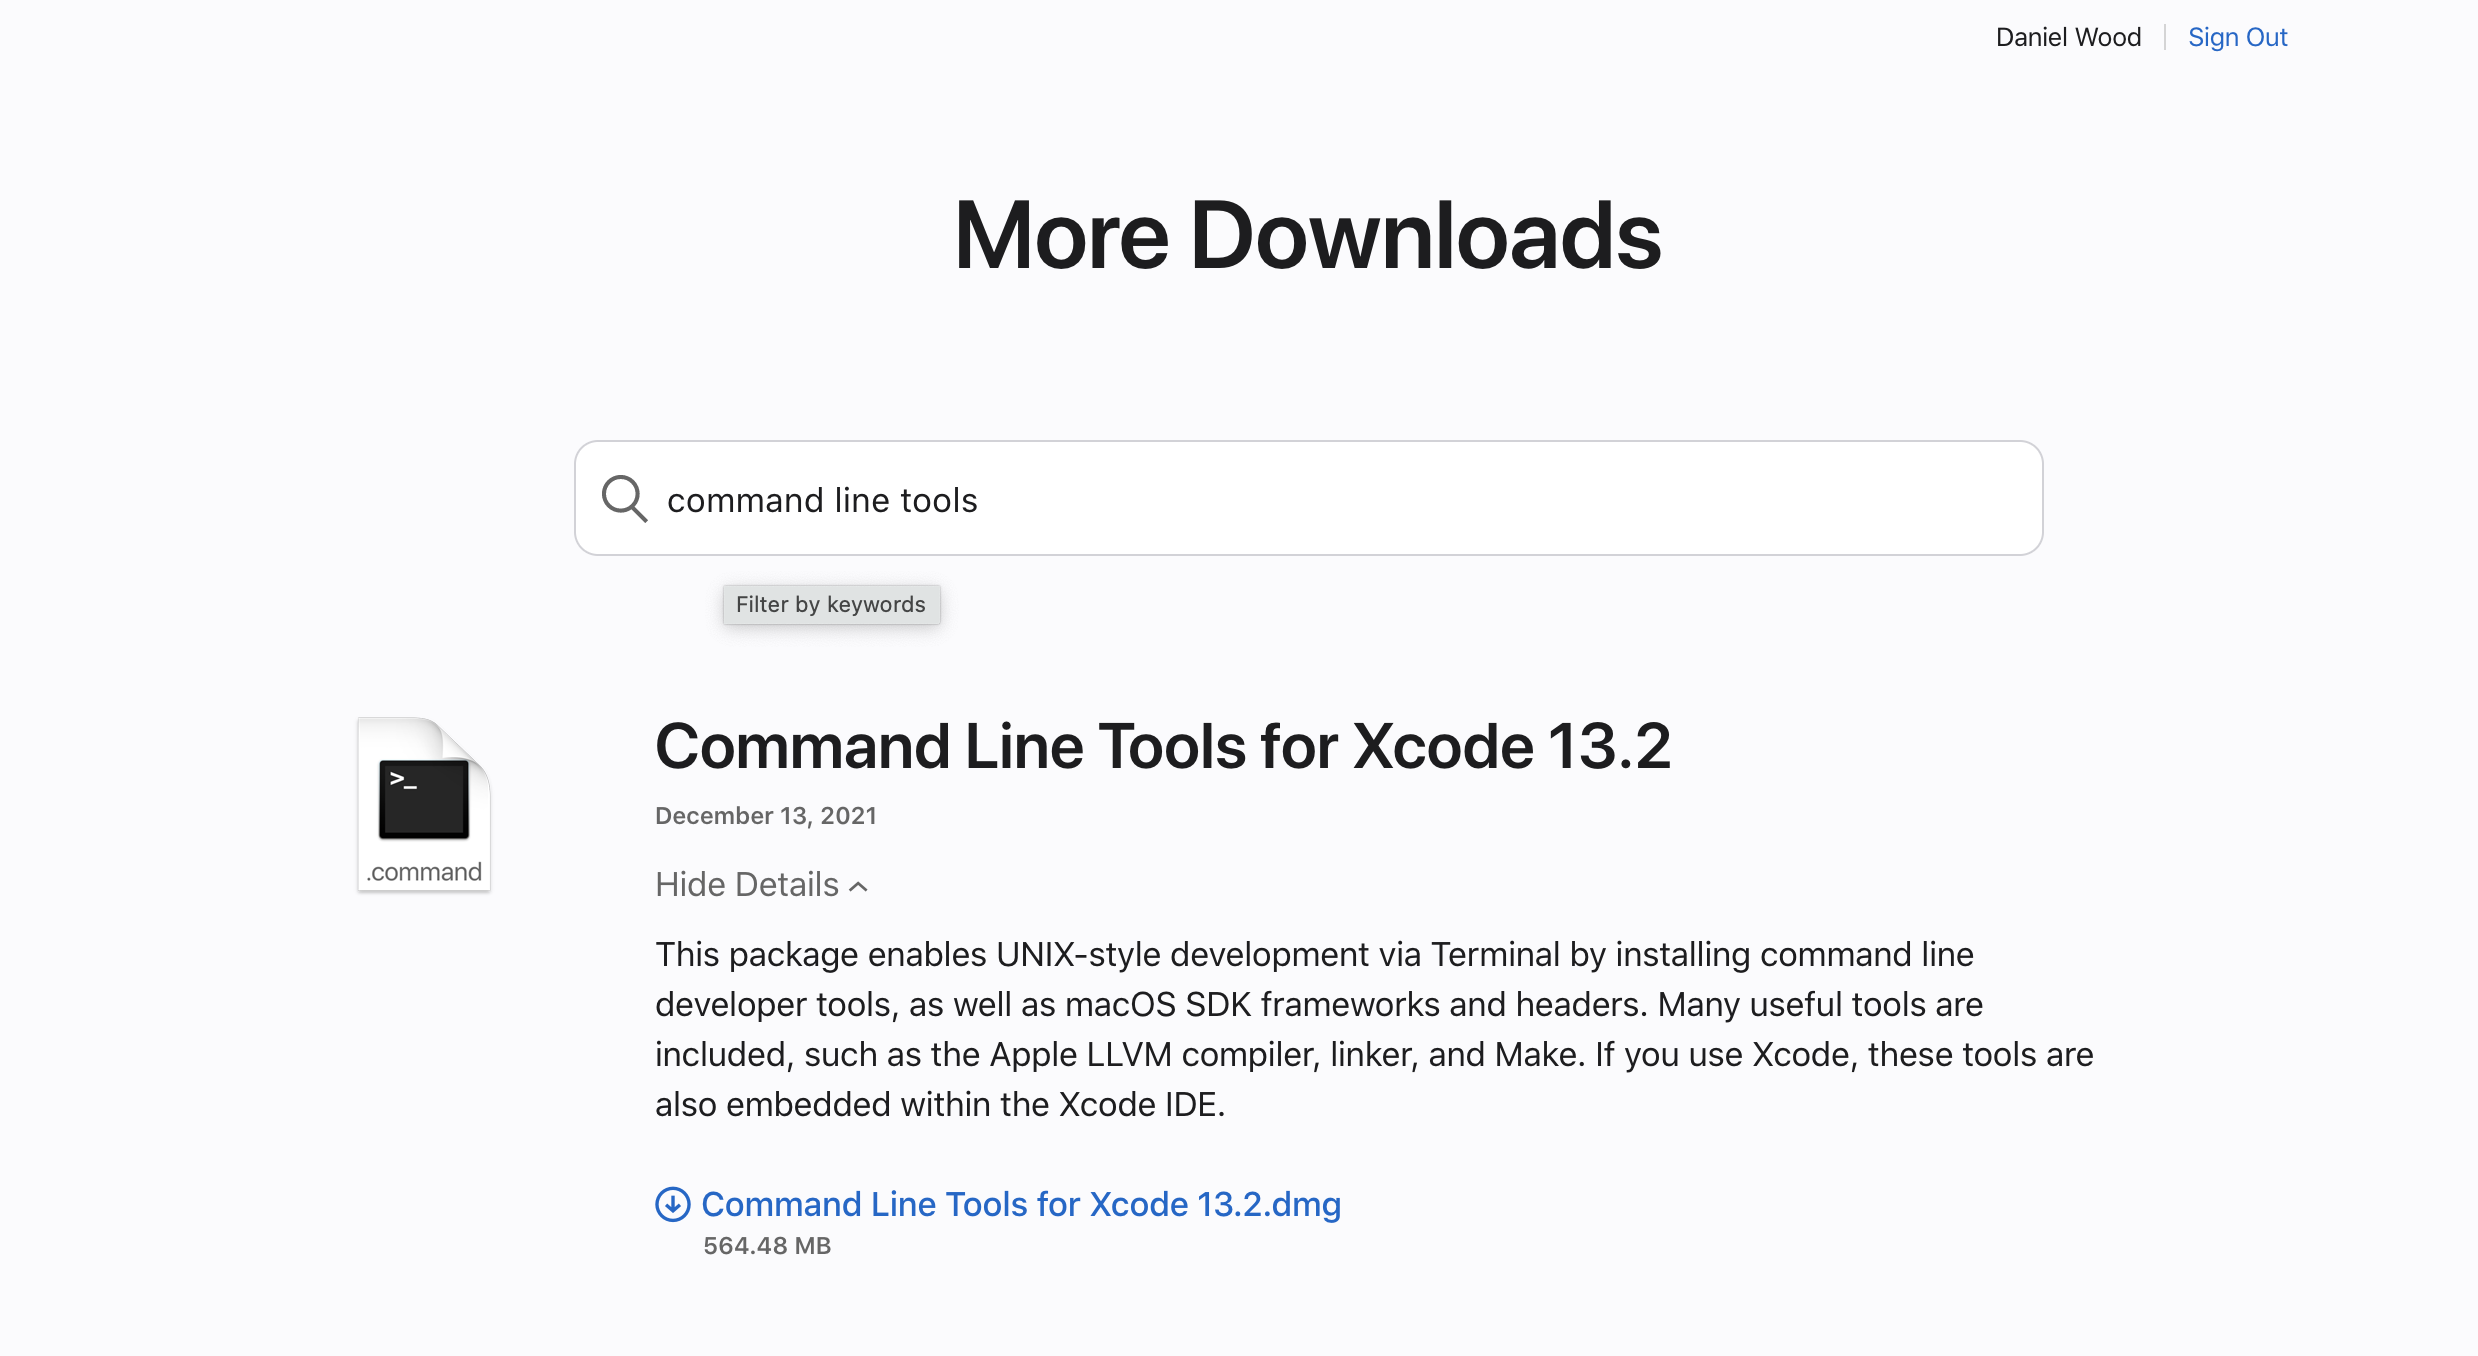
If it doesn’t install, or there isn’t an update for Xcode to install the tools, you’ll have to download the command line tools from developer.apple.com/downloads/index.action. You have to register, or you can log in with your Apple ID.
Search for “command line tools,” and download the most recent package. Double click on the .dmg file in your Downloads folder, and proceed to install.
If you ever run into some variation of a ‘user does not have permission’ error when running a command in the terminal, you may want to prefix the command with sudo. For example, the above command would be run as:
sudo xcode-select --install
After you enter in your administrator password, these installations should proceed as normal. But using sudo is powerful magic, and should be used with caution. For example, generally you do not want to run sudo pip or sudo npm.
Chapter 1: Install Homebrew
Homebrew is like the Mac app store for programming tools. You can access Homebrew via the terminal (like all good things). Inspiration for this section comes from Kenneth Reitz’s excellent Python guide.
Install Homebrew by pasting this command into your terminal and then hitting “enter.”
/bin/bash -c "$(curl -fsSL https://raw.githubusercontent.com/Homebrew/install/HEAD/install.sh)"
It will ask for your password, so type that in and hit “enter” again. Pay attention to any prompts at the end of the process to add Homebrew to your PATH.
Once that’s done, paste this line to test Homebrew:
brew doctor
This will test your Homebrew setup, and any tools you’ve installed to make sure they’re working properly. If they are, Homebrew will tell you:
Your system is ready to brew.
If anything isn’t working properly, follow their instructions to get things working correctly.
Next you’ll need to go in and edit ~/.zshrc to ensures you can use what you’ve just downloaded. .zshrc acts like a configuration file for your terminal.
Note: There are many editors available on your computer. You can use a pretty graphical editor like Sublime Text, or you can use one built-in to your terminal, like vim or nano. We’ll be using nano for this tutorial just to keep things simple. If you’d rather edit in Sublime Text, go to the appendix to learn how to open a file with the edit FILE_NAME command.
Open your .zshrc with the following command.
nano ~/.zshrc
Note: On older MacOS systems, the shell was bash, but MacOS changed it to zsh in v10.15 (Catalina). If you’re using an older OS, instead of editing ~/.zshrc, you’ll want to nano ~/.bash_profile.
Then copy and paste this line of code at the very top. This lets Homebrew handle updating and maintaining the code we’ll be installing.
export PATH=/usr/local/bin:$PATH
Once you’ve added the line of code, you can save the file by typing control + O. Doing so lets you adjust the file name. Just leave it as is, then hit enter to save. Hit control + X to exit. You’ll find yourself back at the command line and needing to update your terminal session like so. Copy and paste the next line of code into your terminal and hit enter.
source ~/.zshrc
You’ll only need to source the .zshrc since we’re editing the file right now. It’s the equivalent of quitting your terminal application and opening it up again, but source lets you soldier forward and setup Python.
Chapter 2: Installing Python and virtual environments with uv
Python is notoriously tricky to install and manage on your machine. XKCD did it justice with this cartoon…

macOS comes with a system version of Python, and for a long time, we used this version. However, modifying the system Python is a bad idea: User alterations or installations may cause core macOS components to break, and macOS system updates may cause user projects to break.
Thus, we need to utilize virtual environments to select our Python versions, allow easy swapping between environments, and tidily maintain dependencies and packages. Modern tools and documentation tend to use Python 3. If you’re on our team, you’ll also need Python 2.7.x for legacy projects.
We’re going to use uv to manage our virtual environments. Follow the instructions to get it installed.
Once you’ve run through those steps, open Terminal to verify installation. (If you already have a terminal window open, restart terminal or type source ~/.zshrc.) Make sure it’s available by running the command uv in terminal.
Note that uv does not work with Python 2.x. For maintaining older projects, we fall back to virtualenv. See appendix for how to install python2 on current Mac hardware.
Installing Jupyter Notebook and pandas
It may be useful to install Jupyter Notebook for data analysis. Before doing this, let’s create and and activate environment for this to live in. You can create a single environment to always run Jupyter notebook, or you can create a new environment each time you start a new Jupyter notebook project.
uv venv
source .venv/bin/activate
The first command created a new folder at .venv in whatever directory you were in with information about a virtual environment. The second command activated that virtual environment, so future commands will be run with respect to that environment. To exit the virtual environment, run deactivate.
You can check to make sure you’re operating in the virtual environment by running which python. This prints the current path to python, which in this case should be your current directory, followed by /.venv/bin/python.
Note that most uv commands require a virtual environment. So even if you haven’t explicitly activated it, the command will search for a virtual environment to operate in, and fail if it can’t find one.
However, you’ll probably need to run non-uv commands in the virtual environment, so it’s important to know how to activate and deactivate an environment manually.
To install jupyter notebook, run uv pip install jupyterlab. After it’s installed, you can run it with jupyter notebook.
To install pandas, run uv pip install pandas.
Chapter 3: Set up Node and install LESS
Many of our tools require Node, which runs JavaScript on the desktop or server. For example, our older projects compile CSS from a dialect called LESS, and our newer projects are built entirely on top of Node. The best way to install Node is using nvm, which lets you easily upgrade and switch between Node versions.
Install nvm with this line. It will ask you to update your shell config, or close and re-open your terminal after it completes.
curl -o- https://raw.githubusercontent.com/nvm-sh/nvm/v0.39.1/install.sh | bash
Once that’s done, you can use nvm to install Node:
nvm install stable
You may want to install a couple of helper libraries for working with our projects. The -g flag means that they’re globally installed, so that they become available as command-line executables:
npm install -g less grunt-cli grunt-init prettier
Next we’ll set up GitHub.
Chapter 4: Configure git
Set up SSH for GitHub
GitHub has written a great guide for setting up SSH authentication for GitHub. You will want to do this so GitHub knows about your computer and will allow you to push to repositories you have access to.
Read that tutorial here, starting at “Step 1: Check for SSH keys”.
Configure the default identity
It’s nice to have your name and email show up correctly in the commit log. To make sure this information is correct, run:
git config --global user.email "$YOUR_EMAIL@npr.org"
git config --global user.name "$YOUR_NAME"
You can also make your GitHub client try to rebase instead of merge when you commit before syncing, which helps prevent extraneous merge commits in the history.
git config --global pull.rebase true
You can also use the GitHub Desktop app to manage your repositories, since it will make it easier to check diffs or browse through repo history.
After that, you can treat yourself to a cup of coffee because you now have the basic tools for working like the NPR News Apps team.
Appendix 1: The Text Editor
Since your code is stored entirely as text files on your computer, you’ll want a nice text editor. Our instructions showed you how to use nano, a terminal-based text editor that you’ll find on almost every computer. However, there are a few others that the team uses. Text editors are like the Microsoft Word of the programming world, except they come packed with all kinds of handy dandy features to make writing code a cinch.
Sublime Text
Sublime Text is another GUI-based editor with a nice interface and some customizations available. You’ll likely want to learn some keyboard shortcuts to make yourself more efficient. You can also prettify it with the Flatland theme.
Note: Speed up your use by making Sublime Text your default editor from the command line. See the terminal section below to see what to add to your .zshrc.
Vim
Vim is a terminal based editor that requires you to type rather than point-and-click to work on files. vim and vi (vim stands for “vi improved”) are likely to be available on any Linux server to which you may find yourself connecting, so it’s not a bad idea to be familiar with how they work.
There’s a lot of little keyboard shortcuts you’ll need to get comfy with before you can just dive-in. Here’s a resource to become more acquainted with vim: Vim Tips Wiki.
A version of vim is already on your computer – just type vim at in the terminal to get started. To get a more up-to-date version, install vim via Homebrew:
brew install vim
You can add all kinds of features with plugins. Former teammate Chris Groskopf recommends nerdtree and surround. Here are some videos to walk through those particular add-ons.
There’s also Janus, a vim distribution that comes with a number of useful plugins preinstalled and with some useful configuration presets. Former teammate Geoff Hing has built up a vim configuration over the years, which you can find here. It uses Vundle to manage installing plugin packages. Pathogen is another popular option and Vim 8 has built-in package management support.
Note: If you’ve found yourself stuck in a vim editor and just want to get out of it, here’s how to quit vim.
Configure your default editor for git
Regardless of which editor you prefer, you should set the default editor used by git. This way, if you run git commit without the -m option, an editor will be opened so you can type a descriptive, nicely-formatted commit message.
You can do this with this command:
git config --global core.editor $PATH\_TO\_EDITOR
For example, you can use the which command to easily find the path to vim:
git config --global core.editor $(which vim)
Appendix 2: Soup up your terminal game
Working in the terminal is a crucial part of our workflow. So soup it up to make it something that you enjoy using. Here are a few optional things to do to enhance your terminal experience.
Add aliases to speed up your work
Adding aliases to your .zshrc files allows you to type short commands for commands you frequently use. Here are a few aliases I use, followed by their descriptions. Paste the following into your .zshrc and edit them to your file paths.
#Aliases
alias edit="open -a /Applications/Sublime\ Text.app"
alias ogit="open \`git remote -v | grep git@github.com | grep fetch | head -1 | cut -f2 | cut -d' ' -f1 | sed -e's/:/\//' -e 's/git@/http:\/\//'\`"
alias sites="cd /PATH/TO/ANY/FREQUENTLY/USED/DIRECTORIES"
edit: To open any file or folder in Sublime Text, typeedit file-or-folder/path. You can replace the path there with any text editor you want to use.ogit: If you’re in a directory that is version controlled remotely on github, you can runogitinside that directory to open up that github page in your default browser. For instance if I runogitin mydailygraphics-nextdirectory it will open up https://github.com/nprapps/dailygraphics-next.- The final example above is a boilerplate example of how you can set up shortcuts to commonly accessed directories. I have one for my sites folder and one for my daily graphics folder.
You can also use something like oh-my-zsh to format your terminal in helpful ways and provide good tab completion. There are many themes to choose from.
Consider an alternative to the default terminal, like iTerm2
Alternatively, you can download an alternative terminal, likeiTerm2. The built-in terminal application which comes with your Mac is fine, but iTerm2 is slicker and more configurable. One of the better features is splitting your terminal into different horizontal and vertical panes: one for an active pane, another for any files you might want to have open, and a third for a local server. (There’s an example in the dailygraphics-next repo, under “terminal shortcut.”)
Solarized is a set of nice, readable colors for iTerm2. Unzip the solarized.zip file. Then, inside iTerm2 go to iTerm > Preferences > Profiles and select “Default.” Choose “Colors” and find the “Color Presets…” button in the lower-right-hand corner of the window. Select “Import” and navigate to solarized/iterm2-colors-solarized/ and double-click on Solarized Dark.itermcolors. After it’s been imported, you can find “Solarized Dark” on the “Load Presets” list. Click and select “Solarized Dark” to change the colors appropriately.
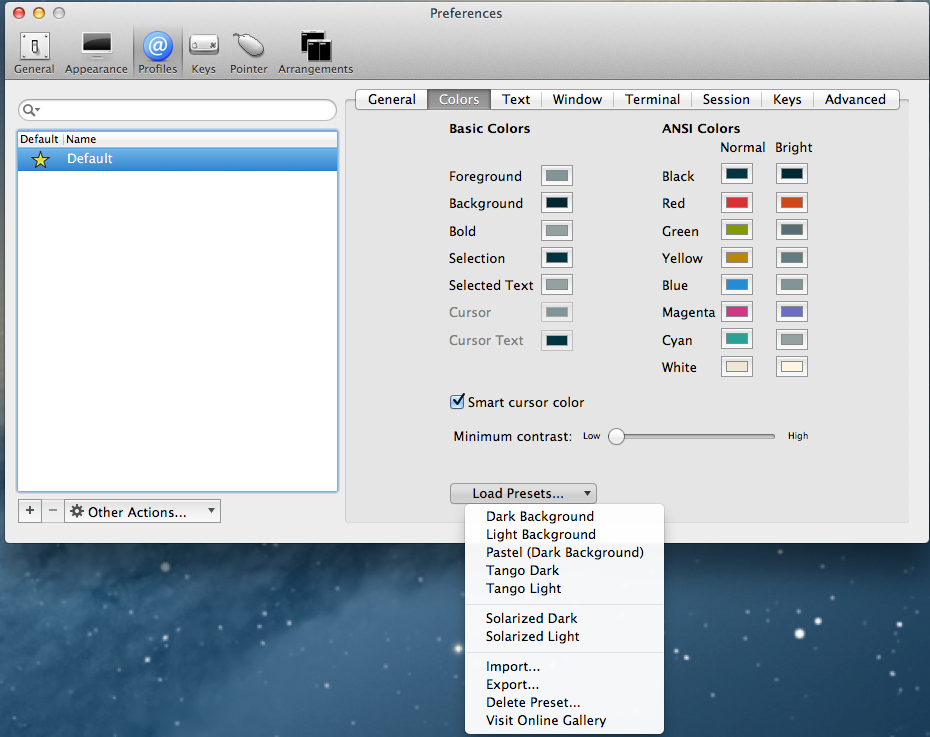
See? Much nicer.
Appendix 3: More helpful software
These are by no means required and should be added as needed, but here are some things our team frequently uses.
Data Analysis:
- Postgres and PostGIS, great for heavy duty data analysis
- csvkit, originally developed by former teammate Chris Groskopf, great for analyzing and working with large csvs
- Tabula, great for extracting data from PDFs
- SQLiteStudio if you particularly enjoy parsing data with SQL
Maps:
- QGIS of course!
- Mapshaper for simplifying geo layers
- Mapshaper command line, even more cosmic power than the web interface. A ton of utilities for creating maps and map layers from the command line.
- PostGIS (see above)
- Blender for hillshades or oblique views
- GDAL command line tools. Much of this is packaged inside of QGIS, but the command line tool can be useful, separately for scripting. Here a cheat sheet of useful commands.
- Imagemagick and ffmpeg command line tools, great for optimizing images and videos.
Design:
- Color Oracle for helping test the color accessibility of your screen.
- ai2html for getting .ai into….uh… .html….it’s right there in the name.
- svg crowbar for getting d3 and other svg graphics out of the browser.
Conclusion
And with that you now have a sweet hackintosh. Happy hacking!
Appendix: Using python2
Installing python 2.x on ARM Macs.
Some of our older projects use Python 2.x. Until these are updated, we’ll need some way to maintain them. Current Mac hardware (ARM-based) uses Python 3.
To install Python 2.x on ARM Macs, we’ll use pyenv.
Assuming you’ve already installed Homebrew (from our setup guide), run brew install pyenv
After it’s installed, you can run pyenv versions to see what Python versions pyenv can see. This might just be your system version.
Next, run pyenv install 2.7.
Now pyenv versions should show 2.7.XX as available to pyenv.
Run pyenv init and follow the instructions. This will ask you to update the config files for your shell. The relevant portion of mine looks like:
PATH=$(pyenv root)/shims:$PATH

 export PYENV_ROOT="$HOME/.pyenv"

[[ -d $PYENV_ROOT/bin ]] && export PATH="$PYENV_ROOT/bin:$PATH"

eval "$(pyenv init - zsh)"
Save that and source it (source ~/.zshrc) or reload your shell.
Now you can select Python 2 either for the current shell session or a folder by running pyenv shell 2 or pyenv local 2 respectively. Then you can check by running python --version.